Making identical U2F hardware security keys
Posted

TLDR: In order to test that I can do an account takeover, I have created two identical U2F hardware authentication tokens. Due to the nature of the U2F protocol, the supply chain attack against someone would work only once.
This small project started as a thought experiment. We always hear how SMS-based two-factor authentication is considered insecure against the advanced adversary. How we should use Universal 2nd Factor (U2F) in the form of the USB authentication token instead. But are there any scenarios, where using U2F device itself can expose us to a sophisticated attack?
The attack scenario
Let’s suppose that an attacked person does not understand this kind of technology. Victim does not use any command-line interface commands to set up the key outside of basic ones like the reset command. The attack goes as follows:
- We handle a token with a modified firmware to the victim:
- As a company IT personnel
- Conference gift or
- (Fictional conspiracy plot follows) we ship token to the victim as a part of campaign to protect 10 000 high risk activists and journalists around the world
- …Or by other means. The key criterion for us is that the victim starts using our device and that we know which specific device the victim has.
- After some time, we obtain their password. By phishing, finding it in the credential dumps online or else.
- We set the U2F counter on a device in our possession to a number higher than the one on a victim device.
- We execute an account takeover.
At this point, the victim can’t sign with their token anymore as the server sets the counter value to a higher number than the one stored in their device.
The attack scenario is highly theoretical and has a lot of assumptions, but can the average software engineer do a technical realisation of it? Let’s find out.
Creating duplicate U2F keys: From idea to reality
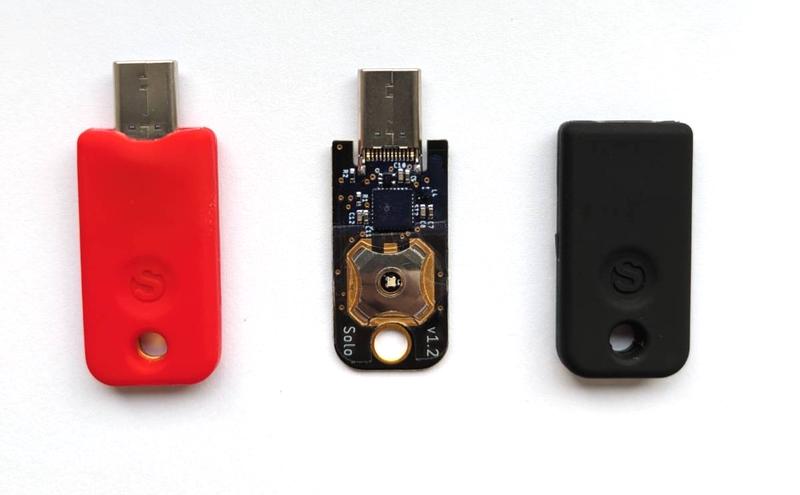
I have bought two Solo 1 Tap USB-A devices. The version with unlocked firmware is no longer available as they are selling a Solo 2 product now instead. Device uses STM32L432 microcontroller which is an Arm Cortex-M4 32-bit RISC microcontroller with all the necessary features, like true random number generator and flash memory protection.
I have installed Python Solo1 CLI, but I found out it’s broken and need some love. I searched trough the open pull requests on GitHub, and to my rescue, user Philip Rinn created a patch that is adding support for the fido2 library API changes, which is the bug I hit. I forked his repository instead of an official one and continued on my journey.
I inserted the key and ran few commands:
$ solo1 ls
:: Solos
206E329B3141: SoloKeys Solo Hacker 2.3.0

$ solo1 key update
Wrote temporary copy of firmware-4.1.5.json to /tmp/tmp8pfhxdou.json
sha256sums coincide: f36bb365bfddf75004f28af392ae1439192ca0ed821ef496084a75a00d05087a
using signature version <=2.5.3
erasing firmware...
updated firmware 100%
time: 9.26 s
bootloader is verifying signature...
...pass!

Congratulations, your key was updated to the latest firmware version: 4.1.5
The second command failed for some reason. The rerun fixed that.
Building the firmware
The official guide for building Solo firmware is available online. I can recommend to read the firmware code overview.
I have downloaded the code base and put the dependencies in place (Ubuntu 22.04.4):
# Clone firmware repository and submodules
git clone git@github.com:solokeys/solo1.git
cd solo1
git submodule update --init --recursive

## Install ARM toolchain, ~2.5 GB
sudo apt-get install gcc-arm-none-eabi binutils-arm-none-eabi

### Install rust
curl --proto '=https' --tlsv1.2 -sSf https://sh.rustup.rs | sh
rustup target add thumbv7em-none-eabihf
Then I tried to build the firmware:
cd targets/stm32l432
make cbor
make salty
make full-clean # not really needed ?
make firmware-debug-2
When using firmware built with the command firmware-debug-2 instead of firmware, Solo device would not boot until something starts reading its debug messages via the virtual serial port.
The final step in the build process is to write the firmware to the Solo hardware device.
solo1 program bootloader solo.hex
Ta-da! I have managed to write compiled firmware to the device.
Testing the device
To verify the functionality I have to test tokens with some online service. Before doing so, however, I need to listen to the debug messages, otherwise the device would not work.
Let’s install the udev rules so that our OS user does not struggle with the permissions to read the serial device:
#
# We are still in solokeys/solo.git
cd solo/udev
make setup
Then I run solo CLI monitor command in the separate console:
$ solo monitor /dev/ttyACM0
tethered
[ERR] Current firmware version address: 0x8020e68
[ERR] Current firmware version: 4.1.5.0 (04.01.05.00)
[STOR] Auth state is initialized
[STOR] pin not set.
The LED on a key starts blinking. Everything seems to be ready. I have enrolled the key in one of the GitHub accounts of mine. It works. The subsequent log-in to the GitHub platform works as well.
Fixing value of counter and the crypto keys
With the clear understanding of the firmware update process, I started digging into the actual source code. The idea was to find parts of the code, where the cryptographic material is generated when the token is initialized for the first time and also parts of the code which are being executed once the rekey event is triggered by the user.
The internal state is being held in the AuthenticatorState structure, which is being overwritten with 0xff in the ctap_state_init(), before the newly generated cryptographic material is put in place.
For simplicity, instead of handling my own key generation, I opt to just comment out existing generation, which means I can expect 0xff value everywhere.
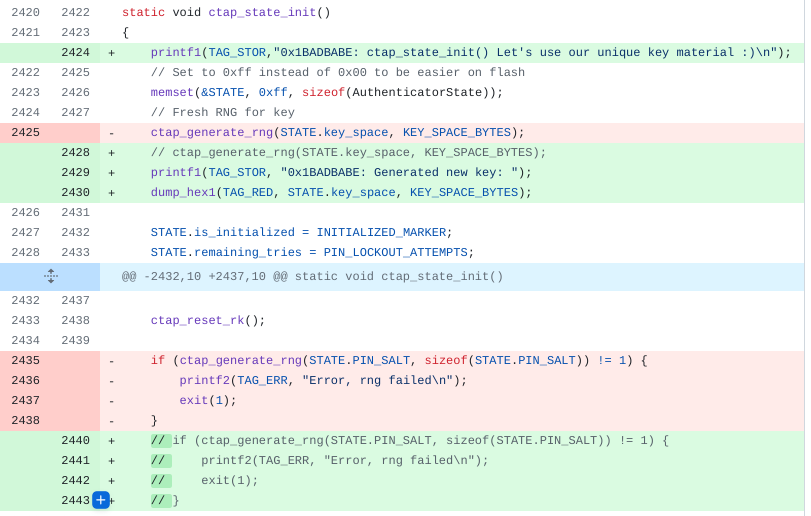
The other place which I fixed was ctap_reset_key_agreement() function which generates a a new keyAgreement key pair. The last fixed place is in ctap_reset() function, where the unique PIN key is generated. That one is used when we tap the physical button.
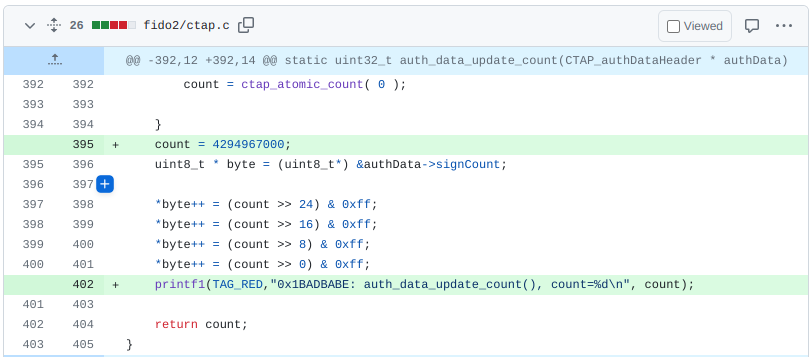
Modifying the counter value becomes important in the third step of the attack, when we need to modify the counter before using the token in our possession. Any number higher than one used by the genuine device should be accepted by the server. The U2F protocol reserves 32 bits for the counter value, which means, setting the value to a large number, but smaller than 2^32 should work. To verify the theory, I have hard coded the counter value to 4294967000 in the auth_data_update_count() function.
Other than that, I made a minor change to debug variables. I have also put few printf lines to the code base to better understand the execution flow. All the changes can be found in this unmerged PR.
Testing both keys in the wild
I have registered the genuine key (without the fixed counter) with the service online. Then I tested to login with the other key - one with a fixed high value counter. The login worked, but the attack “burns bridges” as it’s not possible to login back with the first, genuine, key after.
Online services save the counter used during the registration. Then they verify that the number is always higher than the one used in a last known communication. It would be interesting to know how the services handle integer overflows, which means that the counter reached the maximum possible value. I have tested this idea only with the GitHub, where the parameters were:
| Step | Counter |
|---|---|
| Registration | 4294967000 |
| Succesful login | 4294967295 |
| Failed login | 4294967296 (== 0) |
The login failed for any counter number after the overflow happened. I suppose that the GitHub is just doing higher than (counter > previous counter) check and there is no way to use the hardware key after you reach the counter limit. I am not sure how the other services like Google, Facebook or Apple would handle it. No bounty to be made there probably.
Final thoughts
This small project took me about a year to finish. The actual work took just a few hours of reading docs and tweaking the firmware. Some hours could have been saved if I started by reading FIDO U2F Raw Message Formats documentation. But who has time for that, when one can start by tweaking the code. It was a fun project. The one I would never finish, especially the write-up part, if not for the fatigue from 100 EUR (two keys, shipping, VAT) investment and the fact how fast technology becomes obsolete. That pushed me over the finish line.
I mean, the firmware is no longer updated and there are Solo 2 devices on the market now. Of course, to test that U2F duplicate would work, I could have used software simulator, without ever touching the hardware. But I had no idea that I will end up testing how the service handle counter overflow when I started working on it. Playing with the hardware was one of the forces that attracted me to this project in the first place.
I still have a few open questions, one of which is, is there a way to find out the counter number from the server? By using some less secure website as an oracle? Or by forcing the user to register the device on my own website?
Finally, this attack scenario can be mitigated by using FIDO2 instead of U2F, as the FIDO2 or WebAuthn store more state on the device.